Saturday, September 8, 2012

What do you see?


http://www.teacherspayteachers.com/Product/Harvest-Clip-Art
What do you think of when you see this image? If you're like me, you're probably sweating a little under the brow, your blood pressure just went up, and you're looking around for a way out of the room. This seemingly simple image of an ear of corn can do that to an elementary teacher. Especially a lower grades elementary teacher. To the common person stumbling upon this image, one may think of summertime and BBQing ears of corn with a side order of ribs and watermelon.

But to a teacher, this image means so much more. It means reality has hit. It means summer is over and real work has begun. No more reviews of last year's standards, no more get-to-know-you games. And less time.

There I said it.

With the summer slipping further behind us soon the days will be getting shorter and our to do lists longer. This year the school that I'm teaching at does a Harvest Festival. This is a new concept to me and I hope my to do list doesn't get tooooo long. 

The talk in the e-mails the last few days is having a scarecrow contest. I'm not sure I'm up for that. Pitting classrooms against each other doesn't seem like a good way to build a community. Why not just have a pumpkin carving station. No competition, just plain old fun...and mess...outside of my classroom of course.

Don't forget to sign up for my Teacher's Notebook Giveaway! 

Friday, September 7, 2012

Blog Hoppin'!

So this week I decided to start hopping around and check out what is going on in the teaching blog world. I can't believe how many different styles of blogs there are! I am amazed at the level of support everyone is giving each other! I also like the shout-outs that are as easy as adding a button to your own blog! I invite everyone who is visiting today to leave your blog link in the comments section below. I'd love to hop over to your blog and check it out!

One thing I kept seeing on several blogs was a cute "Currently" chart. I decided that this is something I want to participate in too!  Thanks to Farley at Oh' Boy 4th Grade for the Currently.


So here's my attempt at a "Currently":


And to top off this blog post. I just want to remind everyone that I'm running my first giveaway this week. Check it out here:


Here's the most delicious ice cream sandwich ever invented:

Two oatmeal cookis, vanilla ice cream between them, all dipped in chocolate. Oh so delicious!

Thursday, September 6, 2012

Pretty Sweet Giveaways!

The Hands On Teacher is having a pretty sweet giveaway! Just thought I'd share!!! Here's her link:

I just came across another giveaway!

I've also decided to have my FIRST giveaway!!! I am giving away my Boxes Border 20 Pack (my number one seller on Teachers Notebook) to two lucky winners! Giveaway runs from Friday 9/7/12-9/15/12. Good luck!


Promethean Board Math (A How To)

Tomorrow will be one week since a Promethean Board was installed in my classroom. And I can't say enough good things about it.
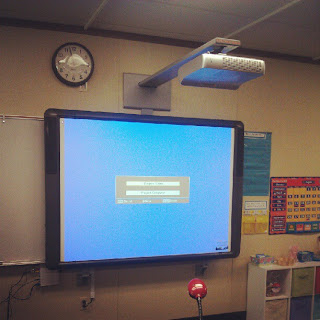
Moments after installation

In playing around with the program ActivInspire I've noticed that my PowerPoint skills have come in quite handy! The flip charts are very similar to PowerPoint.

One of the first ways I wanted to incorporate the board into my daily life was to create a Board Math template for topic 1. To do this, I must first create a "table" in Microsoft Word. 

1. Hit return so that your cursor jumps down one level. I recommend ALWAYS doing this when inserting a table. It will save you headache in the long run should you need to move the table or add a heading at the top.

2. At the top of the screen, click on the "Table" tab and then click "insert", then click "table".
3. How ever many standards you have should be how many columns you need. I use Common Core standards, so I need four columns. Since it's the beginning of the year, I only want about 4 problems per standard. I also want to make sure that I have a row for the title of each standard, so set your rows to 5. Go ahead and leave it set to "auto". Your table should look something like this:

4. Change the layout of your paper to landscape. To do this, click "file" and then "page setup."
Make sure that the picture on the right (where it says "orientation") is highlighted before clicking ok.

5. You should make the table as large as you possibly can without going into the next page. To do this, simply click and drag the bottom right hand corner down to the right.


6. Now hover over the bottom of the line in the top row and then click and drag it up so it is now smaller than the other boxes. 


7. Next, we should make the top row formatted to fit the labels. Starting at the left side top box, left click and drag all the way across the row. All the top boxes should now be highlighted. At the top of your screen, change the font to one of your choice and the size to about 10 and bold. We want the questions in the board math to be bigger than the top labels, so you can play around with the size later. Type in your headings on the top boxes.

Now start from the box below the top box in the left hand corner and do the same highlighting, only this time, go all the way down to the bottom right box. All boxes except the top row should be highlighted. Set these boxes to 20, but not bold (bold takes up too much space).

8. I like to have two word problems for my Operations & Algebraic Thinking column, so I want to merge the boxes. To do that, left click on the second box and highlight to the bottom of the third box, then right click so a menu pops up. Click "merge cells". You should now have two boxes below your far right column.


If you'd like the bottom box larger, simply click on the line separating the two and drag it up like you did to make the top boxes smaller.

9. Now it's time for the fun part. Add all the questions you'd like in each box. Make sure that you don't put specific numbers in. This is one week's worth of board math. You simply erase the specifics each day. The idea is that the students are getting repetition of how to do the problems. Here is what my bare bones Topic 1 (first week) of EnVision Math for first grade looks like:

To make the cup shape, I simply clicked on "insert" then "shape." To change the color, I right clicked on the shape, then clicked on "format shape".


10. Make sure you save your work! BUT we have to save it as a PDF in order to insert it into our flip chart. To do that, at the bottom of the screen when you are at "file" then "save", or "save as", it should say "Format:" Make sure to click "PDF". This saves it sort of like a picture that cannot be changed. Close the file when done.


11. Next, open your new flip chart. Click on "import". This is important! Do not click "insert". It will not let you insert the PDF, only a picture of a PDF file. Once you click "import", then click on your file that has "PDF" attached to the end of it. If you open the file with "doc" at the end, it's not going to work. It should look something like this:


12. Last, to jazz up my board math, I've add shapes that act as manipulatives for some problems, and then used squares to make the data chart. These can be duplicated by clicking on them the click "duplicate" so that if I need more, they are the same size/color.
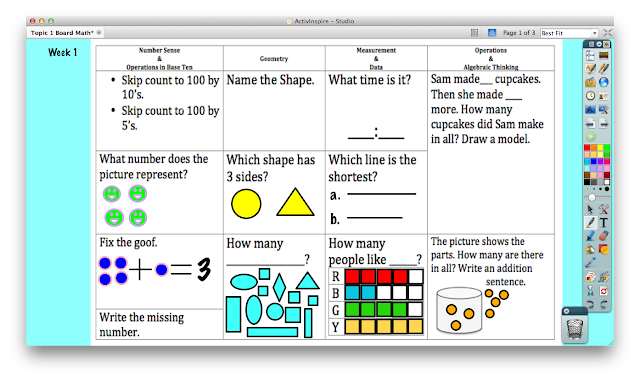
Here is my finished product!


13. AND very last...BE SURE TO SAVE IT!!! I'm always the one who saves saves saves, then suddenly forgets to save and then something happens....in fact, that happened while I was typing this blog entry! Yeesh...some teachers never learn!


TBA's Ultimate Linky Party
You Might Be a First Grader...
Surfing to Success Tips and Tutorials

Monday, September 3, 2012

Edmodo: The Teacher's Facebook (Part 2 )

Yesterday I posted about how great Edmodo is. Today I'm going to tell you how I use it in my classroom.

Last year I taught fifth grade for the first time. We began using Edmodo at our site at the end of the school year. I immediately took to it. It looks so much like Facebook, that it wasn't hard to use. I could also use the app on my phone! I had the students using it to communicate for projects they were working on as well as taking quizzes. I would also give them a questionnaire to answer about how they felt the project went.

Since I'm back in first grade this year, I don't plan on using it with my students. However, the parents can log in under their own username and sign up for my classroom group. At my previous school, many of the parents did not have internet access, so using it was mainly in the classroom with the students.

So this year, I am using it for better parent communication.

In my welcome newsletter, I included a short summary of what Edmodo is and why I wanted the parents to sign up for it. I also included my group access code. Then, I made sure to post the newsletter on my website (a link to that was also in my newsletter. I had also posted the QR Code on the wall in my classroom that led parents to my website). The night the newsletter went home, I had two people sign up. I then posted information about Back To School Night on Edmodo. At Back To School Night, I made a plug for it in front of 20+ parents.

Two days later, a parent approached me apologizing for missing Back To School Night. He said his son had kept the flyer for it in the bottom of his backpack. I then used that opportunity to tell him about Edmodo and how I keep parents informed of events on it. It is SO much easier than an e-mail. I can let all the parents know at the same time!

Did I mention that there is an app for that?