Showing posts with label technology. Show all posts

Thursday, July 24, 2014

Life Hacks With Guest Blogger CaseyJane

Life Hack: Hotkeys Many thanks to Sarah for allowing me to guest post here today! I am CaseyJane from Wiggling Scholars. Sarah is putting together a series of Life Hack posts from guest bloggers. Enjoy these great hacks.
Sarah's post about life hacks mentioned one of my favorite things: "command s"
It got me thinking about computer fluency and my never-ending process of learning new tips to get faster and avoid carpel tunnel.
Are you right-click happy? I know I was for years. Everything was in the right click menu. Need to copy text? Right click. Need to paste text? Right click. Need to (fill in the blank)? Right click. I was addicted to that side of the mouse and it became my go-to. If you have right-click syndrome, you have come to the right blog post.
Here is a techie secret you need to know!
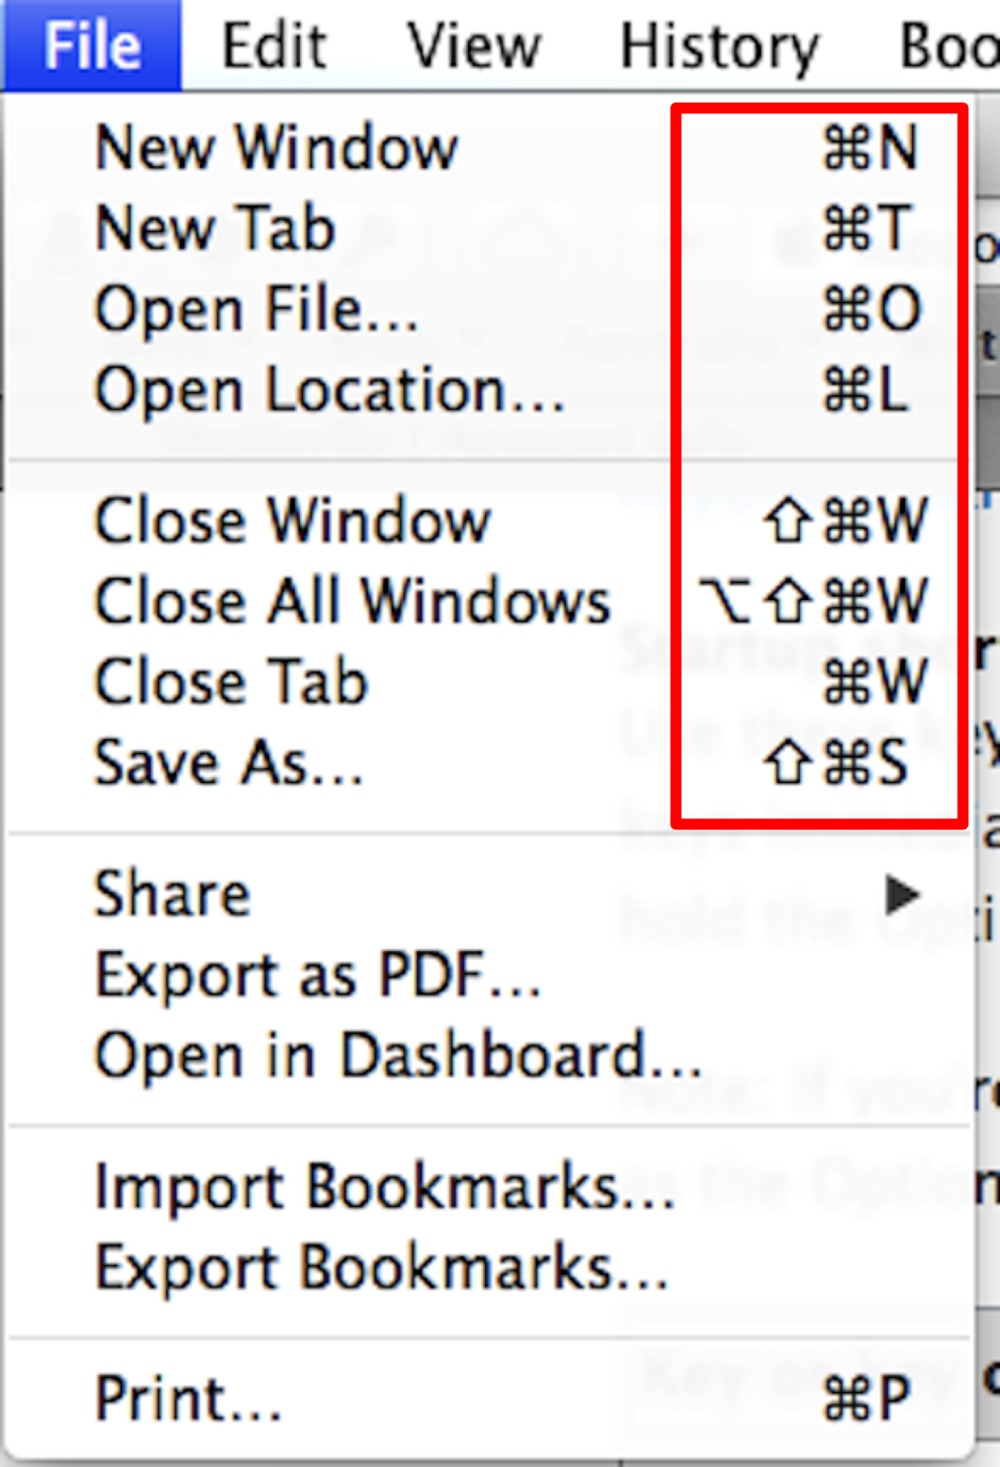
You know those funky things you see in the menus? Those actually mean something! They are a secret time saving code given to you by the geeks (I say geeks lovingly) who wrote the program. Cherish these little nuggets, as they will make you a far more proficient and efficient computer user. What are they called, you ask?
Hot Keys!
Some people call them keyboard shortcuts. Honestly, I prefer 2 syllables to 4. Far more efficient and much more exciting!
That's right~ "command s" is only one of many, yes many of these little keyboard shortcuts called Hotkeys!
Not all hotkeys use the command button, but many of them do. Different computers have different command keys, but these are the 2 main styles.

Image of Apple Command Key
Most hotkeys require only 2 buttons: command and something else. The list below has a "+" sign, but that is asking you to use both buttons at the same time, not to click the plus sign!
These 2 are the most frequently used hotkeys for me. Highlight the text or image you want to copy and click: Command + c (copy) Then follow with: Command + v (paste) It's that simple people!
Have you ever gotten to a website and can't see the tiny images? Or have you opened a PDF and had to look around for the magnifying glass to enlarge? This next tip will make that easier for you! Command + - (minus~ not dash or underscore, makes the image smaller) Command + + (plus~ actually click the plus this time, makes the image larger)
Sometimes you may have 2 programs open (Word and Chrome, for example) and you would like to switch from one program to the other. No need to minimize a window... just click: Command + tab
Ever make mistakes? Right, me either. (wink) But should you make a mistake, try undo: Command + z. To redo: Command + y
For my last trick, sometimes I want to select everything. You know, all of the text in a text box, all of the text on a page, all of the pictures in an album. Just use: Command + a.
I've also included a link to a hotkeys cheat sheet FREEBIE for you to print and have near your computer while you learn! Enjoy!
It is important to note 2 things: 1) Not all hotkeys are the same in every program. 2) You can make your own hotkeys on a Mac! I'm guessing you can do the same on a PC, but as far as I could tell, you'd have to download a program to do that. Mac users: System preferences/ keyboard/ text tab. You're welcome!
Side note: I used a hotkey 43 times while writing and posting this one document. If you image that it takes about 3 seconds to move my hand to the mouse, navigate the mouse, click, and return my hand for each one of those instances, I saved 2.15 minutes. Okay, that seems far less impressive. But when you are a busy teacher or an even busier parent, 2.15 minutes can make a world of difference. Add that up over multiple documents, over multiple weeks, and you will have gained an extra prep time!


Saturday, July 19, 2014

Life Hacks

On the plane back from Las Vegas (yes, I'm still processing that whirlwind four days in Vegas), I watched some free videos on the little screen in front of me. One such video was of "Life Hacks". Life Hacks are things you do to shave time or energy off of your life to make it easier.

I had seen several life hacks on Pinterest, but this guy (Grant Thompson, "The King of Random") showed me exactly how to do some of these things and much more. He showed me that I can peel a kiwi in record time using a spoon. He proved how filling a water bottle part way then placing it on its side in the freezer allows the ice to form, yet still allows for water to be poured in. GENIUS!

I use "Life Hacks" all the time in technology to create my products for TPT. "Command S" is such a simple way to save my work. And at home, my favorite beauty life hack is to use my old mascara brush as an eyebrow brush (after cleaning it, of course. I also use it to brush off any excess mascara I may have.).


It got me to thinking. Next week I'll have guest bloggers on my blog. And what to have those guests write about? How about Life Hacks?! I bet we all have some that we use without giving it a second thought. I love learning new things...especially if they save me time/energy/money.

So what life hacks do you use?

Tuesday, November 27, 2012

My New Technology BFF

Since it is Cyber Monday, and I'm hosting a linky party about technology, I thought I'd continue the week with technology!

Last night my husband came home with a gift for me. I had complained to him earlier in the day that the cords from my Promethean board to my laptop keep falling between the two desks every night afternoon when I unplug them to go home.

He bought me a solution...and it was from the dollar section at Target! Here are pictures of it in action:


*sold in other colors too!

This little rubber device* has adhesive to the back of it, so it sticks to the desk. All my cords fit right in and look so nice and organized! I think the Organization Fairy would be proud! 


----------------------------------------CHRISTMAS LINKY INFO BELOW-------------------------------------

If you have Christmas items you'd like to share, pop on over to Primary Inspiration for her Candy Cane Linky Party! What a cute idea!!! I saw some wish list worthy things from other sites I'm loading into my cart.
Primary Inspiration

Sunday, November 25, 2012

Technology Linky (MY FIRST LINKY!!!)

My school is a magnet school for art, math, science, and technology. I have fully thrown myself into the technology aspect. Being on the laptop and the iPad the school loaned me are both a hobby and now a passion. I'm truly enjoying creating, writing, and sharing.

One of the things I was able to do was create quality board math on the Promethean Board with ActivInspire. To read the blog post, click here. To download it for free, click here.

So I'm hoping that more of you are interested in sharing too! Link up with me!


Rules: 
Your link must be technology related. It could be a story about how you used some form of technology, an anecdote, a link to a technology freebie in your store, or a link to a technology giveaway you are hosting. I'm hoping to read lots of great stories and get some good ideas.


Don't forget to stop by my stores this Monday for some great deals! I'm also hosting a Christmas clip art giveaway on Teacher's Notebook.


Monday, September 3, 2012

Edmodo: The Teacher's Facebook (Part 2 )

Yesterday I posted about how great Edmodo is. Today I'm going to tell you how I use it in my classroom.

Last year I taught fifth grade for the first time. We began using Edmodo at our site at the end of the school year. I immediately took to it. It looks so much like Facebook, that it wasn't hard to use. I could also use the app on my phone! I had the students using it to communicate for projects they were working on as well as taking quizzes. I would also give them a questionnaire to answer about how they felt the project went.

Since I'm back in first grade this year, I don't plan on using it with my students. However, the parents can log in under their own username and sign up for my classroom group. At my previous school, many of the parents did not have internet access, so using it was mainly in the classroom with the students.

So this year, I am using it for better parent communication.

In my welcome newsletter, I included a short summary of what Edmodo is and why I wanted the parents to sign up for it. I also included my group access code. Then, I made sure to post the newsletter on my website (a link to that was also in my newsletter. I had also posted the QR Code on the wall in my classroom that led parents to my website). The night the newsletter went home, I had two people sign up. I then posted information about Back To School Night on Edmodo. At Back To School Night, I made a plug for it in front of 20+ parents.

Two days later, a parent approached me apologizing for missing Back To School Night. He said his son had kept the flyer for it in the bottom of his backpack. I then used that opportunity to tell him about Edmodo and how I keep parents informed of events on it. It is SO much easier than an e-mail. I can let all the parents know at the same time!

Did I mention that there is an app for that?

Sunday, September 2, 2012

Edmodo: The Teacher's Facebook (Part 1)

My district is encouraging us to use a new website that I absolutely love! It's called Edmodo and it is so user-friendly! It looks almost exactly like Facebook, but without all the annoying ads and games. The best part about Edmodo, is that it's designed for schools. So in order to be "friends" (or as they call it, "connect") with others, you have to be enrolled in the same groups. Here's a screenshot of my Edmodo home screen:
*I have obviously blocked out sensitive information.
There is a separate sign up for teachers, parents, and students. In order for parents and students to sign up, they have to know your specific code (see part 2 for more information). Parents are unable to interact with students, but they are able to see what their own student is doing.

Another plus is that this site allows for teachers, students, and parents to belong to different groups. When you post, you must specifically state which of your groups you are posting to. Since I currently belong to two groups (my school's group and my own room's group), I make sure that I am only posting to my room's group when stating information about Back To School Night or parent volunteer information. You are also able to create subgroups which comes in handy when you have group projects.

With Edmodo, as a teacher, you are able to create polls, tests, and add documents. Tests are a wonderful way to easily see who is understanding the material because it even grades it for you. Parents can log in and see how their student did (no more missing out on progress reports because they "lost it" on the way home from school).

As a teacher, you are also able to delete any post that a student or parent has posted that may be inappropriate. I had to do this with my fifth graders last year when the band LMFAO suddenly became a topic of conversation.

Since students are so used to Facebook, they easily can navigate the site. However, it's safe because only people you invite are allowed into your groups.

One of my favorite features is one that is just an added plus. You can create badges to give to students that shows up on their profile. This is a perfect reward system that gives students bragging rights. I created a "first to join" badge for parents.


When the school year is over, you are able to either hide the groups, delete them, or even just delete the current members. At any time, you can change the specific code to your group so past members can't rejoin.

Tomorrow I will post part 2 to my excitement about Edmodo and tell you how I use it in my first grade classroom.

Sunday, August 26, 2012

QR Codes in the Classroom (A How To)

Ever see a symbol like this around your town or in an ad?
Are you wondering what they are and how to use them? They are everywhere these days! And they can help you in your classroom. I'll walk you through it.

First off, they are called QR codes. And the one above, will link you to my TeachersNotebook store. Let's begin with how to use them. 

If you have a smart phone (i.e. a Blackberry, an iPhone, a Droid), you can go to your app store and download a QR reader app. This app acts as a scanner. When you take a picture of the code, it will link you to whatever the creator would like to see. It could be a website (as the one above), it could be a Twitter or Facebook link, an e-mail, information to an event, or even contact information. I personally have one for when my son and I are at the park and I want to exchange information with a mommy for a future play date. The mom scans my code on my phone and suddenly has my phone number and e-mail loaded into hers! This is so much simpler than carrying around business cards or typing in phone numbers.

These codes can be generated for free and then downloaded onto your computer. You can even create one with a different color and customize picture!

Simple QR Code generator that allows you to plug in even information: Zxing.appspot.com

A slightly more "high tech" QR Code generator that allows you to pick the color: QRStuff.com

If you are looking to track how many people are using your code, for a small fee, you can upgrade from the free membership: beqrious.com

Once you have created your QR Code and saved it to your computer, now the fun begins! 

When I made my "Welcome to Mrs. Magallano's Classroom" newsletter, I made sure to put a QR Code in the front of the newsletter. That code takes the parents to my website. On my website are my procedures, field trip information, donations wish lists, Scholastic order information, about me, and even classroom rules. I also have created a "current events" section where I upload a copy of my newsletter in case parents lose the one I sent home. 

*obviously information has been changed

Since I did this, I have had more parents come up to me with items for donations than when I sent home just a newsletter. I also have more parents contacting me via e-mail as well as asking about things from my "About Me" section. It feels more personal this way.

Not only can I use QR codes for better parent/teacher communication, I can also use them with students inside the classroom. I haven't done this yet, but I plan on it. When I do, I'll be sure to post more about it. My plan is to create QR Codes for the students to scan and explore science websites. They get to use iPads every week. SOoooo....since we are a science and art magnet school, as well as technology, I will print out different QR Codes for different stations for the kids to scan with their iPads. I can't wait! 

Pssst...by the way, the blue QR code will take you to my Teachers Pay Teachers store.